 Most people say there are two ways to create digital 3D Models - 1) manually, using CAD (Computer Aided Design) and 3D Modeling software/apps - and 2) by scanning real-world objects with a camera or other scanning equipment to automatically interpret them into 3D Models.
But there's a third way to create 3D Models - you can CODE them.
Coding to create 3D Models
You can write a program which gives the computer commands which creates 3D objects. If you're a programmer, you can try something called OpenSCAD - which is basically a programming language which defines 3D objects. If you're not yet a programmer, and want to (or are willing to) learn some programming basics that pretty much anyone can learn, you can try BlocksCAD.
Overview of BlocksCAD
BlocksCAD is a block programming tool - similar to those used to teach coding to kids - which has commands and tools to create 3D Objects and is super easy to learn for kids or adults. It is available on the web, through your browser, so no programs to download and it is very friendly for Chromebooks.
BlocksCAD was developed by the Massachusetts-based Einsteins Workshop - a learning organization for kids. It combines aspects of doing simple programming (aka coding) with aspects of simple 3D Modeling. The results of BlocksCAD code are 3D Models which can be downloaded in .STL format for 3D Printing or for use in other programs which import .STL files (almost all do).
 |
| BlocksCAD interface - 3 main parts |
Get Started in BlocksCAD
The BlocksCAD interface consists of 3 main parts:
1 - Library of available blocks
2 - YOUR blocks (that's your code)
3 - 3D Model Viewer
The process of creation is quite simple:
> Find the blocks you need from the Library of available blocks. Each category on the left side expands out to reveal all the blocks available in that category.
 |
| Sample flow - choosing the SPHERE block, and rendering it. |
> Adjust the values used in the blocks as needed. Each block has it's own options relevant to that command - for example - the Sphere block asks for the radius of the sphere.
> Click "Render" in the 3D Model Viewer to see the results!
Creating your first Coded 3D Model
Let's keep this really simple to start. Let's create a rectangle. Pay attention - this is so quick you might miss it....
> Click on the "3D Shapes" category on the left side.
> Grab the "CUBE" block and drag it to the main screen area (in the center).
> Click "RENDER" on the viewer window.
> DONE. You just coded your first 3D Model!
Notice that the CUBE block has 3 values and one option. The X, Y and Z values define the size of each of those dimensions. You can click on those and change them. Click RENDER after each change to see what they do. The "Not Centered" option could have been changed to "Centered" to put the model in the middle of all axis.
Using a Variable to Modify Your Shape
 Now let's use a "variable" - a placeholder which has a value - to help define the dimensions of your shape. In this case, we'll define the X-Dimension of your cube (actually, rectangle).
> Go to the "VARIABLE" category
> Drag the "Set Item To" block into your blocks space and connect it to the top of the CUBE block. It should snap into place.
> Let's name the variable better to make it something more relevant. Use the dropdown on "Item" in the block to select "New Variable" and name it "xSize". This will represent the value in millimeters of the X-dimension of the cube.
> Go to the "MATH" category and drag the "0" value block (the tiny blue one on the top) into the empty space in that "Set xSize To" block.
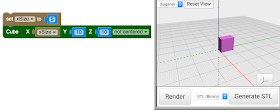
> Change the value in the "0" block to "5" for now.
 > In the VARIABLE category again, drag out the "xSize" block - which represents now the value stored in the variable you named "xSize".
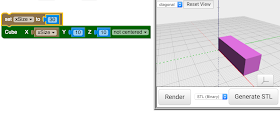
> Drop that "xSize" value block into the cube block where the "X" value is shown (there's a "10" there now). Dropping this block will push the other block out of there. you can click that "10" block once and then hit the "delete" key on your keyboard to delete it.
You now have a simple way to model a cube with any X dimension simply by changing the value of the xSize variable. Not super useful yet - but later you will see why using variable gives you power to easily make adjustable models for customization without re-drawing models.
Advantages of Coding 3D Models
 |
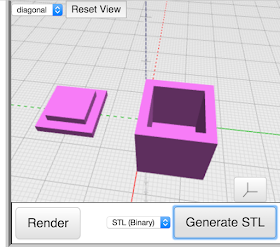
| The hollow box example you will learn in the next post |
Let's take scaling for example (making a model larger or smaller)...
Most 3D Modeling apps and even Slicer apps make it easy to scale a 3D model to get larger or smaller sizes. But, sometimes, simple scaling can not achieve the desired outcome. For example, if you have a simple, square, hollow, open-top box which is 20mm square with walls which are 2mm thick. If you want a 40mm box, you can easily scale the model to 200% before printing. But then the walls of the new box will be twice as thick - 4mm instead of 2mm. That is not likely what you wanted. Most modeling apps even let you constrain the scaling to X, Y or Z axis - but in this example, there is no way to avoid the change to the wall thickness.
With Coding, I could easily separate the thickness of the walls of this box to be it's own setting (it's own VARIABLE!). This, in fact is the exact example which we will review in the next post - so stick around! In the next lesson, we'll learn how to make a 3D Hollow Box that Grows!
NOTE: this is the first in a 4-part series on making models with BlocksCAD code.
Part-1 - Making 3D Models with Code Blocks (aka Intro to BlocksCAD)
Part 2 - BlocksCAD 102 - Coding a #3D Box that Grows
Part 3 - BlocksCAD 103 - Making the Fitted Box Top
Part 4 - BlocksCAD 104 - 3D Modeling a Multi-Compartment Box with Code
Part 4 - BlocksCAD 104 - 3D Modeling a Multi-Compartment Box with Code
hi i am looking this block 12 number for my magic shows.
ReplyDeletewill you please help me to get in india.
awaiting your positive reply.
thank you.