BlocksCAD combines two of my favorite things: Coding and 3D Modeling. I've written about BlocksCAD before - to show the basics of how code can be used to produce 3D Models - and more recently I found a real world use for this tool that I just had to share.
Note: This is basically the 4th in a series of posts about modeling with BlocksCAD. The first is here.
Background
A while back I created a small "Battery Holder Box" - which was specifically designed to hold one type of button battery - the CR2032. This small battery has specific dimensions, so my 3D Model was made to fit that specific battery. I made a single model with specially sized compartments to hold 10 of these batteries.
About a week later, I needed another similar box to hold LR44 batteries, which are slightly different dimensions than the first - so I went through the painstaking process of reproducing the battery box to those dimensions.
Then a few weeks after that, I wanted a similar box to hold SD cards - and again, I grimaced while I considered repeating all the steps to create a specially sized box to hold a dozen SD cards. Then it struck me - I can CODE THIS!
The Power of BlocksCAD
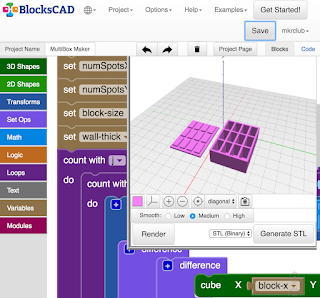 As a software engineer, I'm trained to recognize patterns like this - and it's exciting when a pattern as obvious as the above can be turned into code. That's what BlocksCAD lets me do! Using code to produce storage boxes like this, I can use parameters (variables) to change the measurements in my code, and within seconds, have practically ANY size compartment and box configuration!
How I Made AnyBox - an overview
I'm going to give you just the basics here - I won't describe every line of code (or, in this case block of code).
I start by creating ONE compartment. It's basically a hollowed out rectangle meant to hold something - a box. From there, I simply make a bunch of those compartments by repeating the same code as many times as necessary. I do this in two dimensions - so I can have, for example, 3 across and 4 down, or 1 across and 3 down - similar to what a book case might look like. Once the boxes are done, I create a TOP - with the exact configuration of n across and m down as the boxes, but with a more flat extrusion vertically.
That's the high level story - below is the detail...
 Making the First Box
I start by creating ONE box, one compartment - using 3 variables - the width (X), the length (Y) and the height (Z). These measurements are the measurements of the INSIDE of the compartment that I wanted. So I basically measure the dimensions of the object I'm trying to hold in the box, and use those for X, Y and Z.
The "CUBE" block in BlocksCAD easily produces the cube with those dimensions. But I don't actually want a solid cube, I want a hollow cube. To achieve a hollow cube, I have to use the TRANSFORM / MINUS block to subtract this cube from a slightly larger cube.
To decide how much larger that outer cube should be, I have another variable which holds the "Wall Thickness" (let's call that W here) of the box I want - and I add that to the original X, Y and Z dimensions to get the outer cube dimensions. Now the outer box can be defined as X+W, Y+W, Z+W.
Watch The Box Multiply
Now that I have ONE compartment successfully made, I can repeat the creation to make an array of boxes connected to each other to get the "cubby" look I'm aiming for. Remember the original reason for this was to hold several of the same item - button batteries in my case.
One of the great things about programming is that once you figure out how to do something, you can re-use the code to do it again. So in this case, now that I know how to make a box in the dimensions I want, I can just repeat the code to do it again. All I have to do is start the second box just next to the first, and then again, start the third box, just next to the second, etc.
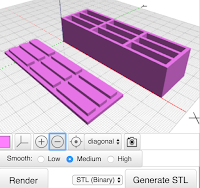 I do this with a LOOP (in coding, it is also called "iteration") to simply repeat the running of that box-creation code over and over again, as many times as the number of boxes I want. Since I want the option to have multi-dimensional cubbies - I also need a second loop around that first loop to repeat that whole set of boxes again, making another set of n boxes next to the first set of n boxes.
This is a very common pattern in coding whenever you are dealing with any sort of array - in this case it happens to be the physical creation of a multi-dimensional array object.
Making The Box Top
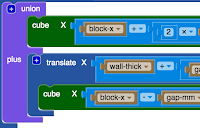 Before worrying about the complicated box top needed to cover this multi-box configuration I've now created, I need to make a TOP for that ONE compartment first. To do this, I'll use the same X, Y measurements from earlier - but I really don't need the Z, as the top will be mostly a flat top with minimal depth.
I start by creating a simple rectangle which is the same dimensions as the outer dimensions of the box - that is X+W by Y+W - which accounts for the width of the box walls again. Now, instead of hollowing out, like we did for the box, this time we want to create a slightly raised, slightly smaller panel which fits snugly inside the top of the box to hold the top on. This is done by creating another rectangle on top of the first which does NOT include the wall thickness, but just the inside dimensions X and Y.
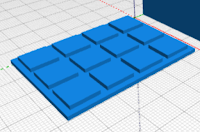
Now that we have one box compartment, we simply do the same thing we did with the box, and use a double loop to create the same number of tops connected to each other as we the box had.
Practical Addition From Testing
Along the way, of course I tested the creation of the single box, then multiple boxes in one row, then multiple boxes in an array of 2 x 3 and larger. The box was working quite well! But once I actually put objects in the box, button batteries in my case, I found a slight problem. There was no great way to get the objects OUT of the box! I had to turn over the box to get one object out, which of course dumped all the objects out.
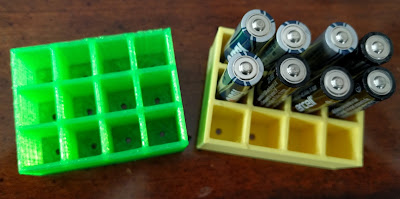 To solve this, I added one small feature - or should I say, I subtracted something. I created a small circular hole at the bottom of each compartment (by subtracting a centered cylinder from the base of each box) - which can be used to push objects out of their compartment when needed (using a paperclip or other small pointy object). This worked just fine!
The Missing Steps Have The Real Learning
Like with all great projects, the description above doesn't really tell the whole story. There are many details left out. I don't do this to torture you, but rather because I can't remember all the smaller tweaks and adjustments I had to make to make this project work - AND, because that is where all the learning is! If I gave you every detail, you'd learn much less than if you had to figure out some of the stuff yourself.
Chances are, in doing this project yourself, you'll discover a completely new way to do this project or perhaps invent some other cool object I didn't think about!
NOTE: this is the FOURTH in a 4-part series on making models with BlocksCAD code.
Part-1 - Making 3D Models with Code Blocks (aka Intro to BlocksCAD)
Part 2 - BlocksCAD 102 - Coding a #3D Box that Grows


